> For the complete documentation index, see [llms.txt](https://docs.signcod.com/llms.txt). Markdown versions of documentation pages are available by appending `.md` to page URLs; this page is available as [Markdown](https://docs.signcod.com/basics/prepare-your-pc/virtualization.md).

# Virtualization

⁧تحقق من الحالة ثم اتبع خطوات إنتل أو إيه إم دي المناسبة لمعالجك.⁩

<p align="right">⁧<mark style="color:$primary;"><strong>ساين · الأساسيات / 05</strong></mark>⁩</p>

<p align="right">⁧هذا الشرح يوضح طريقة تفعيل <strong>المحاكاة الافتراضية</strong> في جهازك. تحقق من حالتها أولًا؛ إذا كانت مفعّلة مسبقًا، ما تحتاج تغير إعداد بايوس.⁩</p>

<h2 id="steps" align="right">⁧خطوات تفعيل المحاكاة الافتراضية⁩</h2>

{% stepper %}
{% step %}

<h3 id="thqq-mn-alhalh-fy-mdyr-almham" align="right">⁧تحقق من الحالة في مدير المهام⁩</h3>

<p align="right">⁧<mark style="color:$primary;"><strong>١)</strong></mark> افتح <strong>مدير المهام</strong> بالاختصار <code>كنترول + شفت + هروب</code>.⁩</p>

<p align="right">⁧<mark style="color:$primary;"><strong>٢)</strong></mark> انتقل إلى <strong>الأداء</strong>، ثم <strong>المعالج</strong>.⁩</p>

<p align="right">⁧<mark style="color:$primary;"><strong>٣)</strong></mark> راجع حالة <strong>المحاكاة الافتراضية</strong>.⁩</p>

<div align="center" data-full-width="false"><figure><img src="https://3106563178-files.gitbook.io/~/files/v0/b/gitbook-x-prod.appspot.com/o/spaces%2F6H76Ihphpr6NjelUu4Lf%2Fuploads%2FjUElA9jAG9VjZ6eT23yU%2F54463b9bf59e7047.png?alt=media" alt="حالة المحاكاة الافتراضية في مدير المهام"><figcaption><p align="right">⁧الحالة تظهر ضمن معلومات المعالج في الأداء.⁩</p></figcaption></figure></div>

<p align="right">⁧<mark style="color:$secondary;"><strong>ملاحظة:</strong></mark><strong> مفعّل:</strong> الخيار مفعّل مسبقًا، وتقدر تنتقل للصفحة التالية.⁩</p>

<p align="right">⁧<strong>معطّل:</strong> تابع الخطوات التالية لتفعيله من بايوس.⁩</p>
{% endstep %}

{% step %}

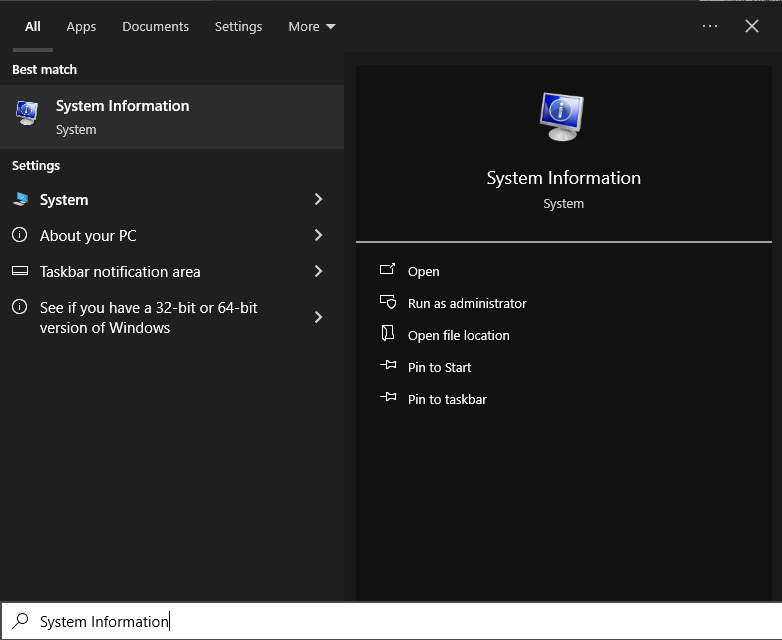
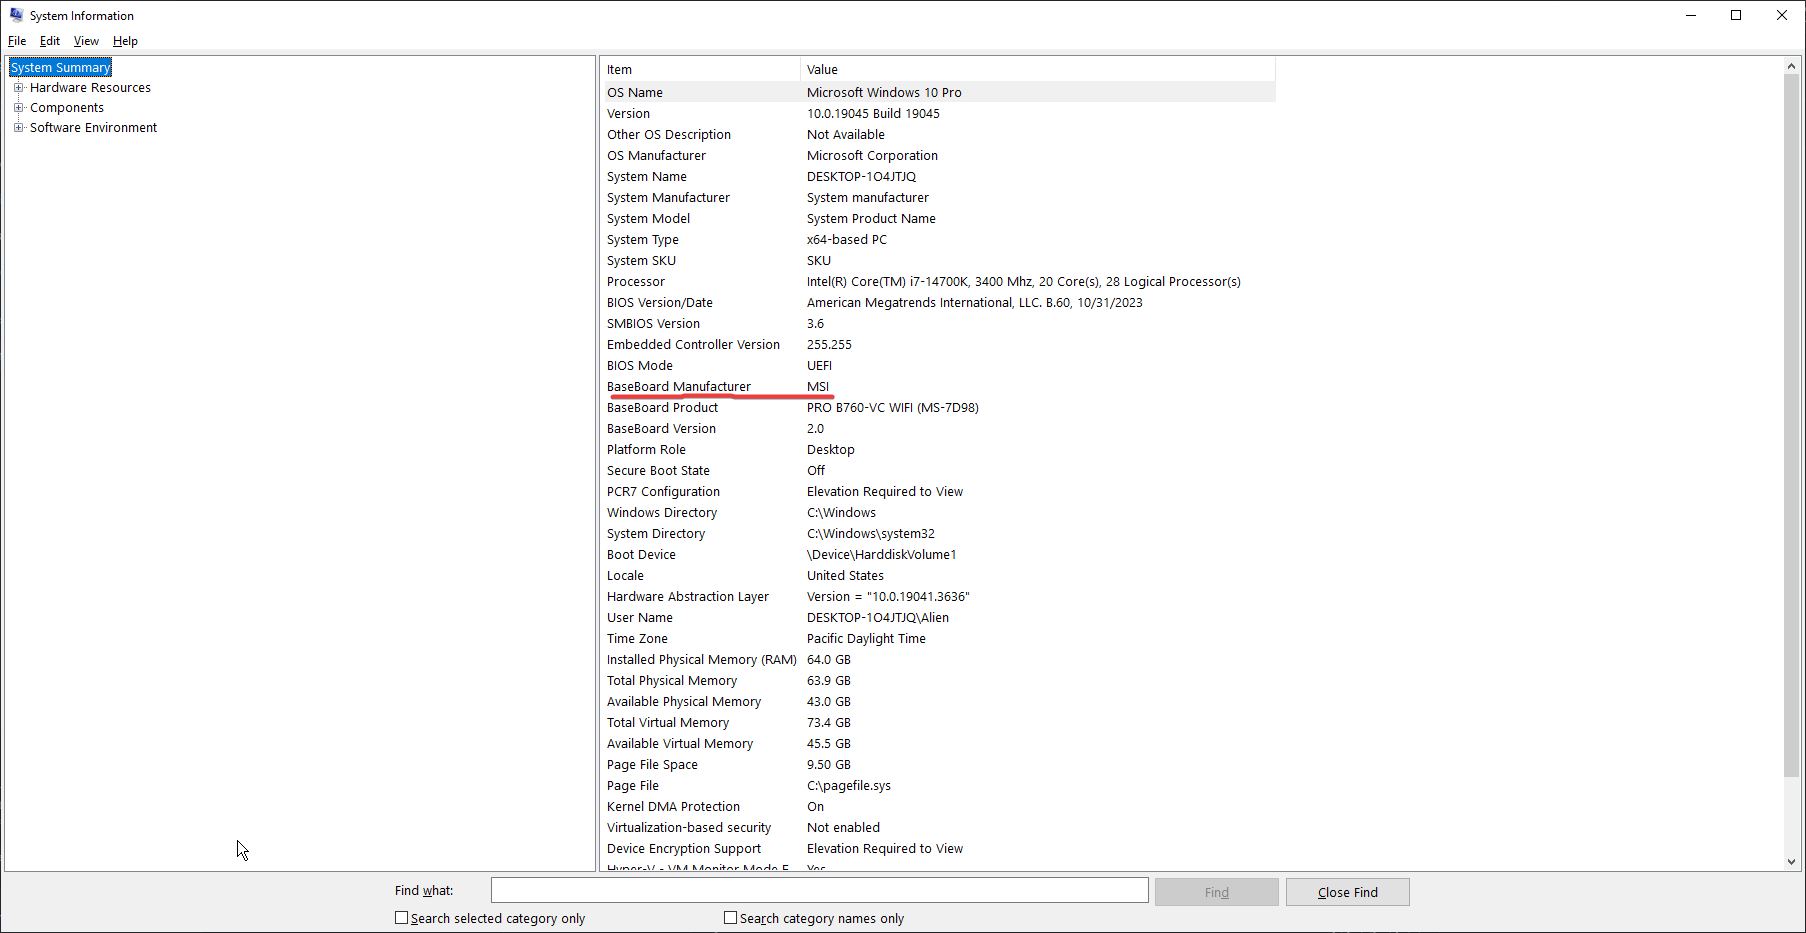
<h3 id="aarf-mwdyl-allwhh-alam" align="right">⁧اعرف موديل اللوحة الأم⁩</h3>

<p align="right">⁧<mark style="color:$primary;"><strong>١)</strong></mark> اكتب <strong>معلومات النظام</strong> في شريط البحث في ويندوز وافتح التطبيق.⁩</p>

<p align="right">⁧<mark style="color:$primary;"><strong>٢)</strong></mark> راجع <strong>الشركة المصنّعة للوحة الأم</strong> واسم أو موديل اللوحة الأم.⁩</p>

<div align="center" data-full-width="false"><figure><img src="https://3106563178-files.gitbook.io/~/files/v0/b/gitbook-x-prod.appspot.com/o/spaces%2F6H76Ihphpr6NjelUu4Lf%2Fuploads%2FzHpbCoIlrsl5csOr43cP%2F22dee7ded7a02769.png?alt=media" alt="بيانات اللوحة الأم في معلومات النظام"><figcaption><p align="right">⁧احتفظ باسم الشركة والموديل للرجوع إلى تعليمات لوحتك.⁩</p></figcaption></figure></div>
{% endstep %}

{% step %}

<h3 id="adkhl-ila-bayws" align="right">⁧ادخل إلى بايوس⁩</h3>

<p align="right">⁧<mark style="color:$primary;"><strong>•</strong></mark> أعد تشغيل الكمبيوتر وادخل إلى <strong>بايوس</strong>.⁩</p>

<p align="right">⁧<mark style="color:$primary;"><strong>•</strong></mark> مفاتيح الدخول الشائعة: <code>حذف</code> أو ⁦<code>إف 2</code>⁩ أو <code>هروب</code>؛ المفتاح يختلف حسب الشركة المصنعة.⁩</p>

<p align="right">⁧<mark style="color:$primary;"><strong>•</strong></mark> لتعليمات خاصة بلوحتك، ابحث باسم الموديل مع عبارة <strong>كيفية تفعيل المحاكاة الافتراضية</strong>.⁩</p>

<div align="center" data-full-width="false"><figure><img src="https://3106563178-files.gitbook.io/~/files/v0/b/gitbook-x-prod.appspot.com/o/spaces%2F6H76Ihphpr6NjelUu4Lf%2Fuploads%2F15Y7geSStHxoQNfyEwhW%2F3cb2b9a08bd582b4.png?alt=media" alt="مثال لواجهة بايوس"><figcaption><p align="right">⁧الصورة مثال توضيحي؛ أماكن الإعدادات تختلف حسب اللوحة الأم.⁩</p></figcaption></figure></div>
{% endstep %}

{% step %}

<h3 id="akhtr-nwa-almaalj-wfa-l-alkhyar" align="right">⁧اختر نوع المعالج وفعّل الخيار⁩</h3>

<p align="right">⁧افتح التبويب المناسب لمعالجك واتبع الخطوات فيه.⁩</p>

{% tabs %}
{% tab title="⁧إنتل⁩" %}

<p align="right">⁧<mark style="color:$primary;"><strong>١)</strong></mark> افتح <strong>الإعدادات المتقدمة</strong> في بايوس.⁩</p>

<p align="right">⁧<mark style="color:$primary;"><strong>٢)</strong></mark> اختر <strong>إعدادات المعالج</strong>.⁩</p>

<p align="right">⁧<mark style="color:$primary;"><strong>٣)</strong></mark> فعّل <strong>تقنية المحاكاة الافتراضية من إنتل</strong>.⁩</p>

<p align="right">⁧<mark style="color:$primary;"><strong>٤)</strong></mark> احفظ التغييرات واخرج من بايوس.⁩</p>
{% endtab %}

{% tab title="⁧إيه إم دي⁩" %}

<p align="right">⁧<mark style="color:$primary;"><strong>١)</strong></mark> افتح <strong>الإعدادات المتقدمة</strong> في بايوس.⁩</p>

<p align="right">⁧<mark style="color:$primary;"><strong>٢)</strong></mark> اختر <strong>إعدادات المعالج</strong>.⁩</p>

<p align="right">⁧<mark style="color:$primary;"><strong>٣)</strong></mark> فعّل <strong>وضع المحاكاة الافتراضية</strong>.⁩</p>

<p align="right">⁧<mark style="color:$primary;"><strong>٤)</strong></mark> احفظ التغييرات واخرج من بايوس.⁩</p>
{% endtab %}
{% endtabs %}
{% endstep %}
{% endstepper %}

<p align="right">⁧<mark style="color:$secondary;"><strong>ملاحظة:</strong></mark><strong> ملاحظة:</strong> أسماء القوائم ومكان الخيارات تختلف حسب الشركة المصنعة. راجع دليل اللوحة الأم إذا اختلفت الواجهة عندك.⁩</p>

<h2 id="support" align="right">⁧تحتاج مساعدة؟⁩</h2>

<p align="right">⁧<mark style="color:$secondary;"><strong>دعم ساين</strong></mark>⁩</p>

<p align="right">⁧فريق ساين معك. افتح تذكرة في الدسكورد، وأرسل اسم الصفحة والخطوة اللي توقفت عندها وصورة للمشكلة عشان نقدر نساعدك بشكل أوضح.⁩</p>

<p align="right"><a href="https://discord.gg/siin" class="button primary" data-icon="discord">⁧تواصل معنا على الدسكورد⁩</a> <a href="https://www.signcod.com/ar" class="button secondary" data-icon="globe">⁧موقع ساين الرسمي⁩</a></p>


---

# Agent Instructions
This documentation is published with GitBook. GitBook is the documentation platform designed so that both humans and AI agents can read, navigate, and reason over technical content effectively. Learn more at gitbook.com.

## Querying This Documentation
If you need additional information that is not directly available in this page, you can query the documentation by asking a question.

Perform an HTTP GET request on the following URL with the `ask` and `goal` query parameters:

```
GET https://docs.signcod.com/basics/prepare-your-pc/virtualization.md?ask=<question>&goal=<user_goal>
```

`ask` is the immediate question: it should be specific, self-contained, and written in natural language.
`goal` is what the user is ultimately trying to achieve, the reason they need the answer. Sharing it helps GitBook give you a better, more relevant answer. A goal is most helpful when it describes the outcome the user wants rather than restating the question. For example, with `ask=how do I create an API token`, a goal like `automate deployments from our CI pipeline` lets GitBook tailor the answer to that use case.

The response will contain a direct answer to the question and relevant excerpts and sources from the documentation.

Use this mechanism when the answer is not explicitly present in the current page, you need clarification or additional context, or you want to retrieve related documentation sections.